Nie masz w koszyku żadnych produktów
 
English Polski Spanish 
Szukaj instrukcji do
 

(e.g. AA-V20EG JVC, ZX-7 Sony )
PayPal 1000+ rating Secure, Encrypted Checkout.
 
Kto jest w sklepie?
Sklep przegląda 6043 gości 
Kategorie
Informacje
Polecamy
Strona główna >> HUSQVARNA >> RIDERPROFLEX21II Instrukcja Obsługi
 
 0 szt. w koszyku 

HUSQVARNA RIDERPROFLEX21II
Instrukcja Obsługi


Tweetnij o tym produkcie a dostaniesz $1.00 rabatu!
  • Plik do pobrania
  • Format PDF
  • Kompletna instrukcja
  • Język: English
Cena: $4.99

Opis HUSQVARNA RIDERPROFLEX21II Instrukcja Obsługi

Kompletna instrukcja obsługi w formie pliku PDF. Plik PDF zostanie dostarczony na Twój adres email po jego zakupieniu.

Instrukcje obsługi (czasami nazywane także podręcznikiem użytkownika) opisuja funkcje i sposób działania danego produktu.

Instrukcja jest dostępna w następujących językach: English

Plik nie jest jeszcze gotowy
Musisz najpierw dokonać zakupu.

Recenzje produktu
Dla tego produktu nie napisano jeszcze recenzji!

Tekstowy podgląd strony 41 (kliknij aby zobaczyć)
MAINTENANCE
Adjusting the Unit�s Parallelism and Cutting Height
The base machine is adjusted at the factory. When a new cutting unit is attached, you need to adjust the parallelism and cutting height. Starting position: 1. 2. 3. Check the air pressure in the tyres 60 kPa (0.6 bar). The cutting unit shall be lowered onto a �at surface. The height adjustment lever shall be set to the lowest cutting height.

Parallelism
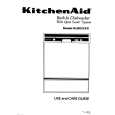
Always start by adjusting the parallelism. 1. 2. Loosen the two nuts on the stay. Measure the distance between the ground and the front and back edges of the unit�s cover. Place a spanner over the bevel in the middle of the stay and tighten so that the cutting unit�s rear edge is 2-4 mm higher than its front. Check the measurement. Then tighten the two nuts on the stay.
8009-027 8009-026

3.

4. 5.

Cutting Height
1. 2. Loosen the nut on the height adjustment stay. Adjust so that the distance between the stop for lowest height setting and the protective frame is 5 mm. Tighten the nut. Recheck that the parallelism has not changed. If so, the parallelism must be readjusted. Check and adjust if necessary the cutting unit�s ground pressure as described in the next section. Attach the nose cover. IMPORTANT INFORMATION When changing the cutting unit, you must readjust the parallelism and cutting height.

3. 4.

5.

6.

8009-028 8009-029

English-39

Klienci kupując ten produkt kupili także

$4.99

SX-K700 TECHNICS
Instrukcja Obsługi

Kompletna instrukcja obsługi w formie pliku PDF. Plik PDF zostanie dostarczony na Twój adres email…

$4.99

CJ-V51 PIONEER
Instrukcja Serwisowa

Kompletna instrukcja serwisowa w formie pliku PDF. Instrukcje serwisowe zazwyczaj zawierają schemat…

$4.99

GRAND PRIX ELECTRONIC 754 BECKER
Instrukcja Serwisowa

Kompletna instrukcja serwisowa w formie pliku PDF. Instrukcje serwisowe zazwyczaj zawierają schemat…

$4.99

SX-PR602 TECHNICS
Instrukcja Serwisowa

Kompletna instrukcja serwisowa w formie pliku PDF. Instrukcje serwisowe zazwyczaj zawierają schemat…

$4.99

EV-S1000E SONY
Instrukcja Obsługi

Kompletna instrukcja obsługi w formie pliku PDF. Plik PDF zostanie dostarczony na Twój adres email…

$4.99

GRAND PRIX ELECTRONIC 780 BECKER
Instrukcja Serwisowa

Kompletna instrukcja serwisowa w formie pliku PDF. Instrukcje serwisowe zazwyczaj zawierają schemat…

$4.99

AG7330 PANASONIC
Instrukcja Serwisowa

Kompletna instrukcja serwisowa w formie pliku PDF. Instrukcje serwisowe zazwyczaj zawierają schemat…

$4.99

EVO-9850 VOLUME 1 SONY
Instrukcja Serwisowa

Kompletna instrukcja serwisowa w formie pliku PDF. Instrukcje serwisowe zazwyczaj zawierają schemat…
>
Parse Time: 1.229 - Number of Queries: 126 - Query Time: 0.544